My Guitar Page

Since I was a kid, I've always been fascinated with the process of making things, particularly, things made of wood. Since my teens, I've developed skills as an amateur woodworker. I learned to play guitar starting at 11 yrs old, and thought it would be fun to make a guitar from scratch using mostly hand tools. I've completely dog-eared my copy of William Cumpiano's "Guitarmaking; Tradition and Technology". It's my 'bible' on guitar making. Here's how I'm doing so far....

Sunday, February 16, 2014

....... and I'm back

After several years of lapse, and other cut-in projects, I've managed to pogress through 2013 until now by planing and sizing the ebony fingerboard. The frets were cut (something I [pardon the pun] fretted about getting right for a long time), until yesterday final fitted and glued the fingerboard in place.

There was a little block of wood I'd fashioned as a glue clamp for the inside body-to-19th fret clamping vise. It was right were I left it a few years a go, so put it to good use.

Here are a couple of shots of the critical last hurdle.


Now, onto shaping the neck, adding the frets and making a bridge. 

I can almost hear it playing an old Beatles tune....

Friday, April 25, 2008

Gluing in the binding strips

After cutting the slot and rabet for the inlay and
binding strips (including a bit of touching up from the errant router exit), the inlay strip and binding are glued in place. Getting a tight match at the intersection of three pieces was a small challenge. :O)
Posted by Picasa

Saturday, February 16, 2008

The Test-Run Glue-Up

There's no putting anything like this together without testing it out first. It turned out, I needed one more inner tube to make my 'stretchy-clamp'.
This joint needs equal pressure all along the seam, no spaces or missed spots allowed.

Just about ready to close!!

Number 00001, last day of December '07. Who knew it would take this long?!?


Got glue?

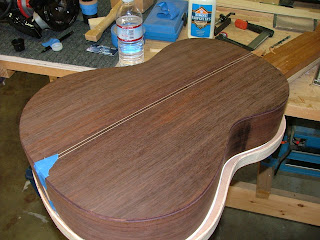
Final touches on the back panel center seam patch.

I didn't like the hard edge of the center seam patch, so took a few judicious swipes with a chisel. Blue tape is for those 'oops' swipes.

Sanding Board Makes the Shape Continuous


William Cumpiano suggests using a sanding board to make sure the joint between sides and back is smooth and continuous. Using it definitely made the glue seam tight.

Sunday, August 05, 2007

Carving the back braces


After gluing the back braces, they are profiled with a slightly half-elliptical cross section to reduce weight.

Monday, May 21, 2007

Fairing the brace curves


Each brace has a slightly different curvature. After planing most of the curve, I went over each with the sanding drum to make sure the face is square to the sides.

Friday, May 18, 2007

... and a year and three months later....

Who'd have thought it would take this long to
slip backinto things. With a few home projects and other 'things' taking the top of the priority list now out of the way, I'm back to the 'back'. Bracing the back that is. Laying out the braces now...

Tuesday, February 28, 2006

Final fitting of side

A few minor tweaks and the side will be glued.  Posted by Picasa

One side gets the Kerfing

A mix of small steel spring clamps from the local office supply store and some rubber tipped 1" spring clamps will hold the kerfing in place. Posted by Picasa